creativehub has the feature to convert files on the fly into various formats, optimised for a range of uses.
Why can I only convert when I download files?
The ides is that you should store your highest resolution files in their original formats in your account. You convert each time on download when you need a new format.
This prevents your creativehub account getting clogged up with lots of image versions, making it harder to find what you need.
Also when you share files with others, in collaborative projects or by sending files, if you give download options then the people you share with will also have the same range of file conversion options.
What conversion options are available and what are their uses?
Right now we have the options to convert from & to the full range of image formats, including SVG and RAW to JPEGS, TIFs and PNGs. We plan to add more conversion options in the future, including video and PDF.
You can resample image files (increasing the number of pixels), change their physical dimensions and change the colour profile in the custom options. Resampling allows you to increase the file size which can be useful if your file isn’t big enough to display or print how you want.
The results from resampling has its limits, you can’t increase the file size too much otherwise the file will start to look worse as it will have digital artefacts (patterns) in the file from the resampling process.
Changing colour profiles allows you to use your image files in a different display medium (e.g. print or on the web) and maintain the delicate balance of colour. If you don’t use profile conversion when displaying in a new medium you can see a colour shift in your images.
Step-by-step guide to using the file conversion options
- Go to your creativehub account and select a file in My Files or a project, or click a link to a project that has been shared with you.
- On the right hand side of the interface you will see this panel:

You can download files in their original formats or select some of the preset options. A common use case is constraining images to a maximum length of side, so for that use this one.

3. You can append or prepend the file name, for example say web use, so filname1.jpg will become filename1_web_use.jpg
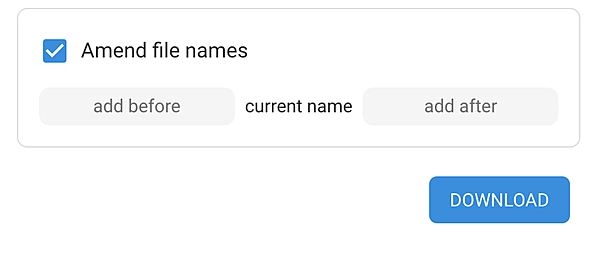
4. Click download when you are ready and your files will download.
NOTE: if you have selected files that cannot be converted, like an html file or a video file, the conversion will only be applied to the files that can be converted. These are currently all image files, including SVG and RAW files
Advanced file conversion
You also have the custom file conversion section, where you can access more granular control over the conversion and save you own presets for future use.
Begin by selecting the ‘custom’ option from the list of download options
You will now see a panel that looks like this:
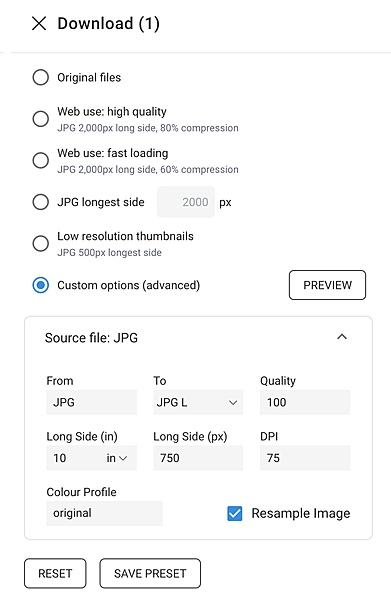
The options are as follows:
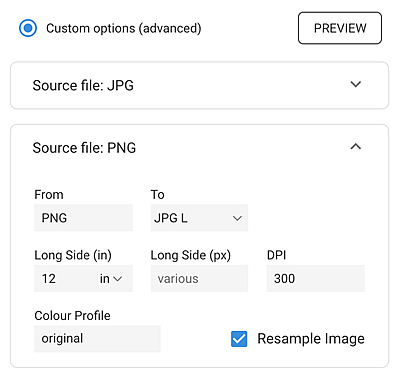
- The file format to convert from. For example if you have selected PNGs and JPGs you will see two of these conversion options boxes, one for the source file JPG and one for the source file PNG. You can apply different conversions to both source files, if you wish.
- The file to convert to:
You can select JPG, PNG or TIF. The other options for each file type will be slightly different, as some filetypes are compressed, others are not. - File compression:
You will see 4 options for JPGs; JPG L, JPG M, JPG S and JPG custom. L, M & S are preset compression rates we think are reasonable, but if you select custom you can choose your own compression rate.
If you are not sure preview a few different compression rates and zoom into the file to see the effect increased compression has on file quality. - Image file dimensions in inches, mm or pixels (px):
You can resize your file with or without resampling. Resampling increases or decreases the file size, i.e. the amount of information (detail) in the file.
So if you have resampling ticked and increase the size in mm or inches, the DPI (dots or pixels per inch) will remain the same, which means that there will be more pixels in the file, the file with have more information (detail).
Likewise a common use case for file conversion is reducing the amount of information in a file, to increase load times or make it easier to send. If you want to do this you make sure resampling is ticked and you change the DPI or the physical file dimensions, and the file size will be reduced.
If you just want to change the dimensions of the file without changing the amount of information in the file then untick resampling and then change the physical file dimensions. The amount of information in the file will remain the same, so with a bigger physical size you will see a proportional decrease in DPI. Double the physical size, the DPI will halve, if you have resampling unticked. - Colour profile:
Colour profiles are used to help maintain colour accuracy of images when displayed or printed in different mediums; different types of printing and paper stock, on screen etc.
The standard colour profile to keep images stored in is Adobe RGB. The other colour profiles we offer are:- sRGB: for use on screens and on the web
- CMYK iso coated V2: this colour profile is useful if you are sending something to print in Europe (including the UK). This is for offset printing, i.e. printing books, magazines, leaflets, zines etc. Note this is not the profile to use for making Fine Art and high quality photo prints with us. Read this article about using colour profiles when making fine art prints with us, which we print at our parent company theprintspace.
- CMYL swop coated 3: this colour profile is useful if you are sending something to print in the USA, Canada and Central and South America. This is for offset printing, i.e. printing books, magazines, leaflets, zines etc.